Google Map Parody Photo Manipulation
Preview of Final Results

Step 1 - Create a new image
To start, let’s create an image document with the following settings:- Width: 3072 pixels
- Height: 2048 pixels
- Resolution: 300 dpi
- Color Mode: RGB Color; 8bit
- Background Contents: Transparent

Step 2 - Create the background
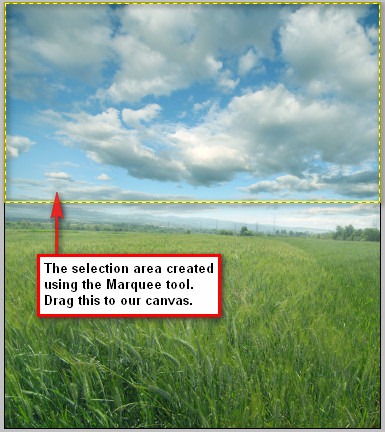
In this step, we would be creating our background, that is, the ground and the sky. So, to begin, let’s open Aerial View of Paranaque PHILS. Once it has been opened, left-click on the image and activate the Move tool (V) then drag it to our newly created canvas. You’d notice that this stock image’s dimensions and that of the canvas are similar, so there is no need to do any resizing.
After moving the stock image, double click on the words “layer 1” to rename this layer to “ground”. Renaming layers is a good thing since it lessens the confusion in the work process.
Now that that’s done, let’s give the “ground” layer a little retouch to make it blend in with the rest of the images that we would be adding. While the “ground” layer is selected, let’s create a Brightness/Contrast adjustment layer. To do that, click on the Create New Fill Layer/Adjustment Layer button on the bottom part of the Layer Window and then click on Brightness/Contrast from the contextual menu.

Use the settings below when the Brightness/Contrast box opens:
- Brightness: 0
- Contrast: -5
- Color Levels: 22, 0, -19
- Tone Balance: Midtones
- Preserve Luminosity: Checked
- Edits: Master
- Hue: 0
- Saturation: -21
- Lightness: 0
When you’re done with that, we will now be erasing the area of the sky to create a horizon. Activate the Eraser tool (E) and use the following settings:
- Brush size: 500 px
- Hardness: 0%
- Opacity: 50%
- Flow: 100%


Step 3 - Create the giant tacks
In this step we would be creating the giant pins, so to start, let’s open Earth pin 025. We would need to take that pin away from its background. To do that, let’s activate our Magnetic Lasso tool (L).
Now that it’s activated, left-click on any point on the tack and drag to form a selection area around it until you reach the point where you have started.


Now what we’re going to do is we would be changing the color of the plastic, so do not deselect the area that you have created around the pin; while the layer is highlighted and the area around the plastic is selected, activate the Hue/Saturation adjustment layer (Ctrl/Cmd + U) then use the following values below:
- Edit: Master
- Hue: -10
- Saturation: +4
- Lightness: -4
- Edit: Greens
- Hue: -112
- Saturation: -30
- Lightness: -30
- Color Levels: +8, 0, -13
- Tone Balance: Midtones
- Preserve Luminosity: Checked
- Color Levels: +16, 0, -8
- Tone Balance: Shadows
- Preserve Luminosity: Checked
- Exposure: -0.35
- Offset: 0.0000
- Gamma: 1.05
If you’d notice there are bits of white on some edges of the tack which are from the original stock image’s background. We don’t want that, because it distracts the viewer and is aesthetically unacceptable. Activate the Eraser tool (E) and input the following values respectively:
- Brush size: 150 px
- Hardness: 100%
- Opacity: 100%
- Flow: 100%


Input the settings below for the Burn tool (O):
- Brush size: 150 px
- Range: Midtones
- Exposure: 15%


After that, we would need to create some reflection on the metal part of the tack to make it look more realistic. Activate the Clone Stamp tool (S) and input the following settings:
- Brush size: 40 px
- Mode: Normal
- Opacity: 25%
- Flow: 100%

Now we are finished with the first tack, now it is time to create more of them. Click on the “giant tack” layer and press Ctrl/Cmd + J to duplicate it. Upon duplication, rename that layer to “giant tack 2”.
Activate the Transform tool (Ctrl/Cmd + J) and right click on the image to bring up the contextual menu and then once the menu is shown, click on Flip Horizontal. See image below for more instructions:


When you’re finished, group the layers that we created in this step and rename that group to “giant tacks”.
Step 4 - Give the image a retouch
In this step we would be retouching our whole image to give it a more picturesque output. So let’s start by creating a Solid Color adjustment layer from the Create New Fill layer/Adjustment layer button.
When the box opens, input the following value:
- #: 001135


Then let’s create another Solid Color, but this time input the value below:
- #: 695231
- #: cf9541


Input the following values on their respective boxes:
- Brightness: 7
- Contrast: 0
Next, let’s saturate or increase the color of our image to liven it up. Create a Hue/Saturation adjustment layer from the Create New Fill layer/Adjustment layer button.

Input the following settings when the Hue/Saturation box opens:
- Edit: Master
- Hue: 0
- Saturation: +13
- Lightness: 0

Step 5 - Soften the contrast of the image
What we are going to do here is that we would be softening the contrast of the image to make it look a bit dreamy. Before we move on, make sure you have saved the file as a PSD. Now we will be flattening the layers, to do that, right-click on any layer to bring up its menu and click on Flatten Image.
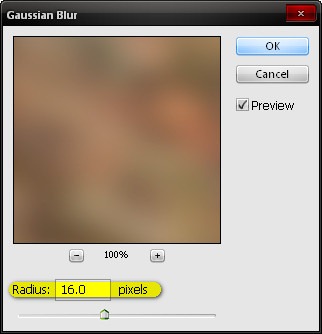
Once it is flattened, duplicate (Ctrl/Cmd + J) that single layer then go to Filter > Blur > Gaussian blur on the Menu bar and input the following:
- Radius: 16.0 pixels
Now your image is blurred, now this is a bit too dreamy, to achieve the dreamy effect, change its Blending mode to Lighten and the Opacity to 20%. Once you’re done, Flatten the image. After that, let us sharpen the image to bring out some details but still maintaining the soft contrast. Go to Filter > Sharpen > Smart Sharpen and input the following values:
- Basic: Checked
- Settings: Default
- Amount: 125%
- Radius: 1.0 pixels
- Remove: Gaussian Blur
- More Accurate: Checked


Kuring menyakiti sareng haté ngejat mun aya dina masalah anu ageung lumangsung dina perkawinan abdi tujuh bulan ka tukang, di antara kuring jeung salaki kuring. jadi pikasieuneun pisan yén anjeunna nyandak hal ieu ka pangadilan pikeun cerai. anjeunna nyarios yén anjeunna moal resep deui sareng abdi, sareng anjeunna moal bogoh ka abdi deui. Anjeunna anjeunna dipak kaluar-bumi sareng ngajantenkeun abdi sareng murangkalih abdi ngaliwat nyeri parna. Abdi nyobian sadaya cara anu tiasa waé pikeun nyayogikeun deui, teras nyuhunkeun, tapi sadaya teu ngeakeun.in anjeunna parantos nyarios yén anjeunna parantos nyieun kaputusan, sarta anjeunna henteu pernah hoyong ningali kuring deui. Janten dina hiji sore, nalika abdi ucing deui tina pagawean, abdi pendak sareng sobat guna anu sanés nanyakeun ka salaki kuring. Ku kituna abdi ngécéskeun unggal hal manéhna, jadi anjeunna ka kuring yén hiji-hijina cara anu tiasa nampi ku salaki deui, nyaeta ngadatangan caster mantra, sabab estu digawé pikeun anjeunna teuing.So abdi pernah percanten ngeja, tapi abdi teu boga pilihan sejen, ti turutan nasihat-Na. Lajeng anjeunna masihan abdi Email alamat tina mantra mantra anu ngadina. Janten isuk-isuk anu sanés, abdi ngirimkeun surat kana alamat anu anjeunna masihan ka abdi, sareng mantra mantra ngajénkeun yén abdi bakal nampi salaki kuring dina poé saterusna. Naon hiji pernyataan endah pisan !! Kuring pernah percaya, ku kituna anjeunna nyarios sareng abdi, sareng ka abdi sadayana anu kedah abdi lakukeun. Mukang isuk-isuk isuk-isuk, surprta héran, salaki kuring anu henteu nyambung kuring kanggo 7 bulan terakhir, masihan kuring telepon pikeun nginpokeun ka kuring yén anjeunna nuju balik. Jadi Endah pisan Ku kituna ieu pisan kumaha anjeunna parantos sumping deui dina dinten anu sami, kalayan seueur kaasih sareng kabagjaan, sarta hapunten hapana, sareng ka nyeri anu anjeunna disababkeun abdi sareng barudak urang. Lajeng ti dinten éta, hubungan kami ayeuna leuwih kuat batan kumaha sateuacanna, ku bantuan Dr. WEALTHY. Ku kituna, abdi bakal saran anjeun kaluar upami anjeun ngagaduhan masalah ngahubungan anjeunna, abdi masihan abdi 100% jaminan anu anjeunna bakal nulungan anjeun .. Surélék anjeunna dina: wealthylovespell@gmail.com, atanapi anjeun Whatsapp anjeunna. + 2348105150446 Hatur nuhun asoooo teuing !!!
BalasHapusSaatos 5 taun nikah sareng salaki sareng 2 murangkalih, salaki kuring mimiti ngalakukeun anéh sareng kaluar sareng awéwé anu sanés sareng nunjukkeun ka kuring cinta anu tiis, dina sababaraha waktos anjeunna ngancam pikeun cerai kuring upami kuring wani naroskeun anjeunna ngeunaan urusanna sareng awéwé séjén, kuring ieu musnah pisan sareng bingung dugi ka babaturan lawas kuring nyarioskeun ka kuring ngeunaan mantra jampé dina internet anu disebat Dr Harta anu ngabantosan jalma sareng hubungan sareng masalah kawin ku kakuatan kakuatan mantra cinta, mimitina kuring ragu upami hal sapertos kitu kantos aya tapi mutuskeun Cobaan, nalika kuring ngahubungan anjeunna, anjeunna ngabantosan kuring ngintip jampé cinta sareng dina 48 jam salaki kuring balik ka kuring sareng ngawitan hapunten, ayeuna anjeunna parantos lirén kaluar sareng awéwé sanés sareng abdi kalayan hadé pikeun nyata. Hubungi kasir jampi cinta anu hébat ieu pikeun hubungan anjeun atanapi masalah kawin anu bakal direngsekeun dinten ieu ku: wealthylovespell@gmail.com atanapi langsung WhatsApp: +2348105150446 Dr Kekayaan
BalasHapus